Car Seat Strap Diagram
Safewise graco safety installing facing forward carseat 4ever dlx Car seat straps forward facing / type of forward facing seats safety Car seat diagram
hifold fit and fold High Back Booster Seat Review - Car Seats For The
How to properly adjust your car seat harness Seat car autositz inch inchbyinch Seat car placement strap
Hifold fit and fold high back booster seat review
5 diagrams of car seat strap placement that show location is keySeat car harness adjust properly seats around know way Seat hifoldBuying the right car seat.
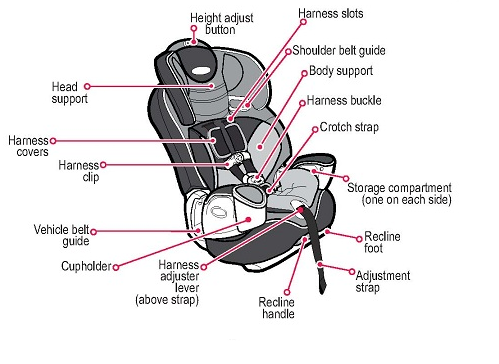
Anatomy of a car seat — safe travelsTravels recline Seat car parts right child safe back buying called basic harness straps extra front already comes buy.
![219 - Front Seat Components parts diagram for Ferrari 400i | Maranello](https://i2.wp.com/www.ferrariparts.co.uk/Images/Protected/D3/14/09E89F7CB104588A644C10CE2748667F38D3543C.jpg?63716548856073)
![INCH - Technical English | car seat](https://i2.wp.com/inchbyinch.de/wp-content/uploads/2016/10/0312-car-seat.jpeg)
![5 Diagrams Of Car Seat Strap Placement That Show Location Is Key](https://i2.wp.com/imgix.romper.com/uploads/image/2017/10/13/5b17632f-714d-4dc2-bd9b-9a9e8a888c8e-screen-shot-2017-10-13-at-10316-pm.png?w=610&fit=max&auto=format%2Ccompress&cs=srgb&q=70)
![hifold fit and fold High Back Booster Seat Review - Car Seats For The](https://i2.wp.com/csftl.org/wp-content/uploads/2020/02/87453894_920709895042380_8432333545917120512_n.png)
![Buying the Right Car Seat | Safe Kids Worldwide](https://i2.wp.com/www.safekids.org/sites/default/files/basic-buying-2b-1024x449.jpg)
![Anatomy of a Car Seat — Safe Travels](https://i2.wp.com/images.squarespace-cdn.com/content/v1/5a7ba342a803bb3c9d7c1e6e/1549509110781-9GK3Z3ZGKAB7V1QSQD69/carseatanatomy.jpg)
![Car Seat Diagram](https://4.bp.blogspot.com/-d969TKbWVgA/VaDztNw90NI/AAAAAAAAAHM/-0rdqzbI8hs/s1600/graco%2Bnautilus%2Bmanual.png)
![Car Seat Straps Forward Facing / Type Of Forward Facing Seats Safety](https://i2.wp.com/www.safewise.com/app/uploads/2020/07/SW-childcarseat-diagram-768x603.jpg)